What is the difference between Margin, Border, and Padding?
A technical post by Cam.
When you first start to play around with CSS you will come to understand that everything (text, images, all content)
has a box around it.
You may not see this box at first, but you will soon praise this box.
This ‘box’ is made up of a few different things…
The Content
The content is whatever it is you have inserted into your HTML.
It could be some text saying “Hello world” or maybe an image of a gazebo.
This content can be sized with the width and height properties.
Padding
The padding is what sits around the content and ‘lets it breathe’. It's an invisible space that is controlled by the padding property in CSS.
When you increase the padding your content will essentially be getting 'squeezed' smaller
Border
The border is exactly what you think it is, it’s a border that sits around the content AND the padding.
Just like padding it can be controlled (sized, styled)
by using the border property in CSS.
The border is mainly used as an aesthetic element, or for debugging purposes.
Margin
The margin is outside everything else we have mentioned. It sits after the border. It wraps together the content, padding, and border in one box and separates
it from another piece of content or another ‘element’ as we call it in HTML.
Just like the padding it's also invisible (whitespace), and it can be controlled
using the margin property in CSS. When you increase the margin you are 'pushing' the other elements on the page out of the way.
So let's remember we are talking about a box here, and what does a box have?
4 sides.
Enough of me writing words.. Show me some pictures!
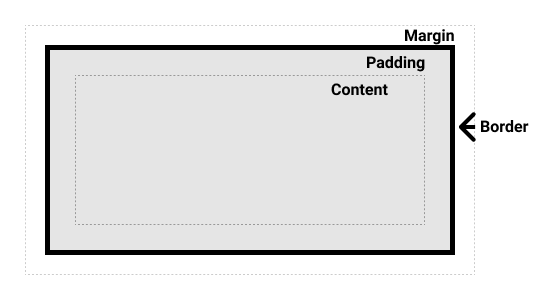
Image showing the box model
This image might be difficult to understand at first, so let’s use an analogy:
Imagine you climb inside a really big cardboard box.
You are the 'content'. The space between you and cardboard box is the padding. Think of the box as the border, and then the
space outside the box is the margin.
You can size the padding, border, margin for all 4 sides of your element. To help with this we have very clear CSS properties to target each side of the box.
Padding-top, padding-bottom, padding-left, padding-right.
Border-top, border-bottom, border-left, border-right
Margin-top, margin-bottom, margin-left, margin-right
Phew! That’s a lot of typing! Fortunately there are shortcuts!
Padding: top, right, bottom, left;
So in code we can write for example:
Padding: 3px 5px 3px 5px;
Notice how it goes clockwise, top, right, bottom, left.. And that's the same for border and margin!
An awesome feature of your internet browser is the developer tools.
When you want to work with CSS, right-click an element on the page (in your browser) and select Inspect to jump into the Elements panel. Or press Command+Option+C (Mac)
or Control+Shift+C (Windows, Linux, Chrome OS).
Built into the developer tools is a little interactive box model, which looks like this:
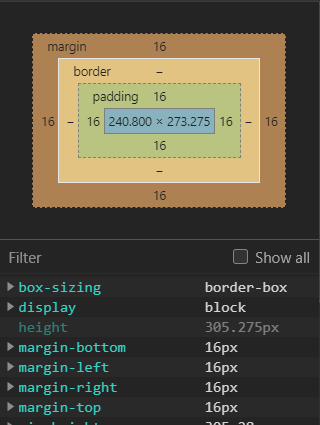
Screenshot of Google Chrome's Box Model
With this feature you can easily see the sizes of the content, padding and margin of a particular element.
This is very helpful for when elements are weirdly sized,
or maybe they are pushing other elements on the page (margin). Use this tool to help debug your code!
Awesome, so what next? you’re probably thinking which one to use and when?
The truth is, I could sit here explaining it to you all day.
But the only way you will really learn is if you go and have a play with it yourself. Break your code and then try and fix it.